
In this review, we will deeply analyze the version 4.0 of popular Adobe software Lightroom. It is one of the most complete functional review available on the Web and can also be useful as a guide to the new features. We will not mention support for new cameras that are added at each major and minor Lightroom upgrade.
Let's start!
System Requirements
For Windows users, support for Windows XP has been dropped, so Windows Vista and Windows 7 are supported. This can cause problems to someone but it's a way to speedup backward compatibility tests in Adobe and Windows 7 is not much more resource hungry than XP (while Vista is) so it's an invitation to go with Windows 7.
For Mac users, support for 32 bit has been dropped and OS must be 10.6.8 or higher.
The RAW cache management has been changed with a strong reduction of cache file size (using compression) so that you can lower the cache size and, I would suggest, delete the cache so that you get rid of large/old style cache files.
Also a video cache file limit has been introduced in the preferences.
Generic changes
- Collections do not store module-specific settings: up to Lightroom 3, collections stored settings related to the module where they were used, so for example a collection in the Web module stored web settings. If you want to store module settings, you can do it creating a web gallery, a slideshow... and so on.
- New 1:8 and 1:16 zoom levels.
- New Context aware Tips (see also Help menu - Show Module Tips).
Import Module
- Video format: .mts video files coming with AVCHD cameras can be imported. Note that there is just a little problem for which these files do not appear in the device section -top of the import box-, but they do show if you browse to the containing folders.
- Folder-based Presets organization: finally presets are grouped into folders (!) throughout Lightroom, so if you have many ones (very likely), you don't get an uncomfortable unique huge list of them.
- Tethering: there is now a layout overlay that helps positioning the camera. You can enable it through the menu Library module -> View -> Layout Overlay and if you hold the Ctrl/Cmd (Win/Mac) key, you can even adjust the appearance (size, position, opacity, matte)! Also clicking the close button while holding Alt/Opt (Win/Mac) key makes the tether toolbar go into the shutter button, nice.
Export Module
- Exporting videos: video can be exported as original unedited, DPX for Premiere or H.264 MP4 file.
- More options on selective metadata export:
- All except camera & camera raw info
- Copyright & Contact info only
- Copyright only
- and a checkbox to remove location info (see below more information about new Map Module).
- Email export using POP/IMAP access to a mail server (so you don't need to have an email client installed to send a photo in a mail).
- Adobe Revel export: to export to online Adobe gallery (previously called Adobe Carousel).
- 64-bit Windows support for DVD burning.
Library Module
- Folders management
- Finally you can move multiple folders at once on Windows, and no more forced to do one by one...
- Some (weird) naming changes to operations: "Add Parent Folder" now is called "Show Parent Folder", while "Promote Subfolders" now is called "Hide this folder".
- When "Show Photos in Subfolders" in off and current selected folder has no images, a message reminds that subfolders are not shown...
- Video support:
- hovering horizontally on a thumbnail in the Grid view makes the video play forward/backward the first seconds.
- export function with 3 formats: original one, H.264 (very good compression for Mpeg4) or DPX for editing in Adobe Premiere.
- possibility to create a virtual copy of the video to make editing on a new version without having to actually duplicate the file (typically quite large...).. yes because....
- some, very basic, editing functionality have been added and are applied to all the video file throught quick develop panel:
- controls for: White Balance, Exposure, Contrast, Whites/Blacks, Vibrance, Saturation by pressing the Alt key (Win) key, conversion to black&white.
- quick presets applicable, that can change split toning, tone curve, color/HSL (for example to make a false colors version).
- in the loupe view (the view to see a single image/video), on the bottom play bar there are three functions:
- clicking on the square icon: capture current frame, set poster frame (to select which frame use for the video in the grid view;
- clicking on the wheel icon: trimming the video in a non-destructive manner, so you don't risk to loose parts of your video (neither you are saving space on your drive...).
- Stacking: finally you can stack photos belonging to different folders! On limitation of stacking in previous versions of Lightroom, you can read our article at this link. Also auto-stacking with 0 second interval between photos is now possible - actually if you would like to stack only RAW+JPG versions and not a burst of shoots, you need go with more fine grain than 1 second...
- Flags management: flags are now global. Finally, you don't loose the flags switching from a folder to another one! Already star ratings and color labels were global, but flags strangely not still in versions 3.x.
- Filtering, Searching and Smart Collections:
- Finally the metadata status has been added, so you can create a smart collection holding images that have a XMP conflict or need XMP to be saved to file (XMP files hold added information to the image, like location, author, etc)! This is useful for catalog house keeping.
- New attributes are added related to new features/capabilities introduced with LR4 version: GPS location, DNG type (e.g. lossy) and "is DNG with fast data load", "Is Proof" to select copies done for the new soft proofing feature.
- Publish services: SmugMug plug-in has been eliminated from LR package since it can be downloaded from SmugHug and updated frequently from SmugHug itself. A link to Lightroom exchange site has been introduced to look for other publish service plugins to be installed.
Quick Develop panel
A new raw engine version has been introduced and it is identified by "Process Verson 2012" - PV2012. The new raw engine supports new features and should bring even more detail with better highlight preservation. The quick develop panel has been significantly changed, rearranging controls but...
you will see the new panel and all new features across Lightroom 4 only if the selected image(s) have the PV2012 set (if not, you will see Lightroom v3 panels). You can do it by selecting images and right click "Develop settings - Update to current process (2012)" or via menu (again "Develop settings - Update to current process (2012)").
- exposure and brightness someway have been merged into a new exposure control that tunes the overall image brightness, so basically focusing on midtones, but with a gentler roll-off towards highlights to avoid over-exposures.
- contrast has been placed right after exposure.
- recovery (for highlights) becomes highlights while fill lights becomes shadows. The new range for highlights and shadow are centered around 0.
- whites has been added to blacks to set respectively luminance levels to be considered as full white and full black.
These settings should be used top-down (starting setting exposure than tuning contrast and so on).
See in the following figure the comparison between Lightroom v3 and the new v4.
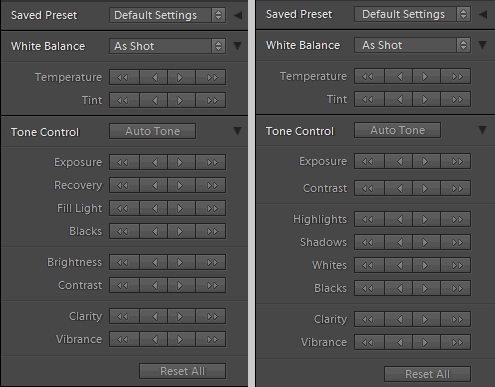 Lightroom 3 vs Lightroom 4 - quick develop
- Clarity effect is improved to avoid creation of haloes, so that you can also use higher values without ruining the image.
- Saved presets are finally grouped by folders and not making a huge flat list.
Metadata panel
- Video: preset for video can be created but of course with very limited fields.
- In the Metadata Preset Editor, checked but empty text fields are shown in red to warn users to create a preset with a void field that would overwrite existing value with the void value.
- Since DNG support has been improved, more information are now displayed (for example type of DNG). See also below in "New DNG format" chapter.
Develop Module
Tools - Local adjustments: new useful settings have been added to local adjustments:
- White balance temp & tint: note that the local adjustment is relative to the overall/global white balance settings, so you are actually making cooler or warmer specific zones.
- Noise reduction
- Moiré removal: moiré is the unwanted effect of digital sensors for which a rainbow pattern is created where there are very close lines . This removal, like chromatic aberration removal, is particularly effective on RAW files that have much more information than JPG counterparts.
Basic (editing) panel
The basic editing panel has been changed according with the changes in the quick develop panel already presented in the description of Grid Module.
Note that contrast is now 0-centered both for RAW and JPG (before it was for JPG only).
See in the following figure the comparison between Lightroom v3 and the new v4.
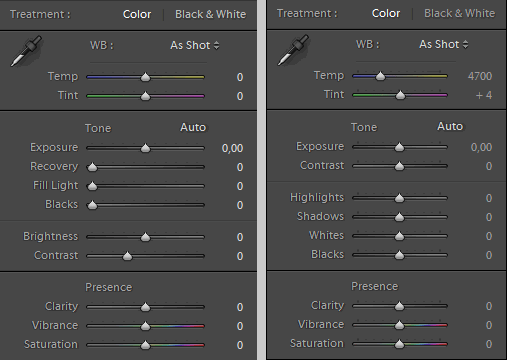 Lightroom 3 vs Lightroom 4 - basic develop
Another important improvement is the organization of presets (quick develop, import, etc.) into folders and no more all the items in a (quite often very long) list.
- White Balance eyedropper: now the 5x5 area used for the sample is built on a square of 5x5 pixels on the monitor, so it changes with the zoom level. Previously it was built out of a 5x5 pixels on the image.
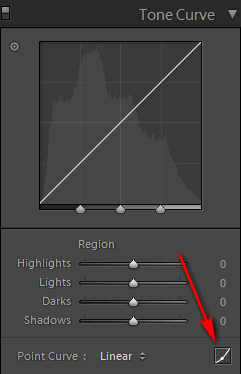
Tone curve panel
- RGB curves have been added, a long awaited feature that enables interesting effects. You have to click on the bottom-right square to reveal the RGB feature (see below). Note also that behavior between RAW and JPG have been uniformed: now levels are 0-centered (while it was just for JPG files).
- Lens Corrections panel
- Automatic Chromatic Aberration correction: previously the Chromatic Aberration correction (for the expert, we are talking about Lateral Chromatic Aberration - LCA, since Lightroom is not able to correct the more complex Transverse Chromatic Aberration - TCA) was corrected with Lightroom built-in lens profiles. Now, besides that, there is a new algorthm that analyzes each image and adds correction based on the specific images, for example with different corrections on the left and right side of the image quite common since lens are not perfectly simmetrical in their defects.
- The counterpart of this improvement is that the slider to tune the amount of correction are gone and you can just decide to correct or not so that you must trust the amount of correction calculated by Lightroom. Practical tests show that this is very effective and maybe you will not miss the gone sliders.
- Like in every LR update, lens profiles have been tuned, especially for keeping into account non full-frame cameras, and new ones added.
- Soft Proofing
- Soft proofing is a preview of how the image would look on a different media than the screen, typically printed out, where color and luminosity curves and range are different from the screen. This is a much awaited feature since for printing your images you cannot make trial and error to understand what is the rendering on paper. The soft proofing is actived pressing the key S (we are in the Develop module) and with right-clicking on the background around the image you can also choose the color of the background itself (for example white for printing on white paper) to simulate the final visual effect.
- Settings: you can choose
- the color profile to be considered for the image (it makes more sense on RAW since the color range/gamut is wider and the RAW image has no embedded color profile -it is RAW...- while JPG has);
- the so called Intent: perceptual that tries to preserve source colors that go out of destination color range at the expense of tuning in-range colors or relative for maximum fidelity of in-range colors at the expense of clipping of-out-range colors;
- the simulated paper & ink option (that are available only after you select an output profile).
- There are clipping warnings in the histogram view dedicated to soft proofing (one for destination, e.g. printed out, and one for monitor) view.
- There is a button to create a virtual copy of the image to be used as a soft proof and the name of the virtual copy includes the profile used for the proof.
- Others
- some minor improvements for cropping, like new ratios, increased range of custom sides for input.
- noise reduction on Previews always considered (also when zooming out).
- Presets panel: as in all other places, the presets are finally organized into folders! Also, right-clicking on a preset you can set it to be automatically applied on import.
- Snapshot panel: default name for snapshots includes the date/time instead of a generic "Untitled snapshot"
Map module
- There is a new map module to place images on google maps (up to now you need third party plugins like Jeffrey Friedl's one).The maps are taken from Google Maps so you need internet access to view the maps that are not stored locally (as Google requires). Actually Adobe made a contract with Google for 5 years access to their maps. Of course this will be renewed when new version of Lightroom will be released - yes... you are forced to upgrade at least in 5 years
 .
. - EXIF GPS information can be read from the images so that LR will place them directly on the map, but since GPS are quite rare so far (except for smartphones but you'd probably use your phone just for emergency shots), you can drag and drop images from the bottom filmstrip module into the map to "geocode" them ("geocoding" is the popular term to write geographical coordinates into an item).
- Also tracklogs with GPX format are read by LR. Tracklogs are GPS logs of a path like a hike trial or a trip. Here, drag&drop images on a tracklog "magically" adjust image embedded time to match the track timeline (time in images is a local time while tracklogs in GPX format have universal time format so Lightroom adds an offset to match the time).
- a GPX file is not exported from a camera/card by Lightroom, you have to manually move it, then go to Map module in Lightroom, enable tools (keyboard 't') and click on the GPS tracklog icon
 .
. - tracklogs can be in other formats than GPX: there are converters for that, one for example is available at this link: www.gpsbabel.org.
- Saved Locations: you can save common locations to be reused later (like a preset) and saved locations can be used for metadata filtering in the top bar of the library view. A saved location can be set as "private" so that the location is discarded when exporting images (for example if you don't want to make public your home or office address).
- While exporting, you can choose if exporting GPS location as normal metadata (also to XMP files) or strip them (locations marked as private are not exported/saved as said in the previous point).
- Search and filter on the map: you can show markers for photos taken on locations shown on current map view.
- Search a location with the search bar: you can search by name (you can give priority to closest locations to current map view), by postal code, by lat/lon coordinates.
- Filter tagged places with Location filter bar: "visible" option shows photos tagged within current view map, "tagged" option dims untagged photos in the filmstrip, "untagged" the reverse.
- Filter using metadata filters.
- Map view options:
- 6 types of the classical Google maps options (hybrid, satellite, road map, terrain, light, dark)
- zooming with slider or +/- keys
- zooming to a particular region by holding Alt/Opt key while selecting a rectangular area
- overlay info by pressing I key (like in the Develop and Loupe views)
- Markers: markers that represent a single image bounce when you mouse over (not for markers that represent a group). Clicking on the marker on the map opens up a strip with related images thumbs.
- Library view: images that have GPS coordinates set show a new icon badge (a pin) on the thumb in the library view. Clicking on the arrow aside the coordinates in the metadata panel leads you to the Map Module to show the location, while Alt/Opt clicking on the arrow opens up google maps website in your default web browser!
- After assigning a map marker to a photo, Lightroom can reverse geocode the location to estimate the address based on GPS coordinates.
Book module
- The second new module is the Book module that allows to create photobooks and send to Blurb server for having it printed down or export (currently only as PDF). Of course several builtin templates are available and you can create new ones or modify existing ones.
- There are many options to create a book and it is more fun to test them all instead of describing here. We will just highlight here some of the areas of configuration and way of operations:
- several view options with zooming;
- layout guidelines;
- drag and drop photos from filmstrip (hit F6 to enable/disable filmstrip) into book page locations and move among locations themselves. The numeric badge on each photo in the filmstrip shows how many times the photo is used in the book.
- auto layout for fast creating a book with selected images (first one becomes the front cover and the last one the back cover).
- options to format page and photo caption texts, that can be moved for a better positioning. Right-clicking on a text cell allows to use Auto text where you can use photo metadata for automatic captioning. Typical text style like font, color, size, opacity, justification and so on are available.
- You can save text style presets.
- In the Book menu - Book Preferences, you can choose some default settings.
- There is a Text Targeted Adjustment - TAT tool to set text appearance in a visual way:
- horizontal drag changes size (relative to previous size so you can modify different sized texts together)
- horizontal drag + Ctrl/Cmd (windows/mac) changes tracking
- horizontal on the insertion cursor changes kerning (spaces between characters)
- vertical drag causes heigth or leading adjustment
- vertical drag + Ctrl/Cmd (windows/mac) changes baseline
- holding Alt/Opt disables the TAT so that you can change the selection to later apply the TAT. If you press Escape, you exit from the TAT.
- Covers: models coming from blurb service with customization possible
- Backgrounds: using a photo from lightroom catalog or a builtin one. You can also change background for specific book pages.
- Saving the book, duplicating it, sending to Blurb with price estimation (if you include Blurb logo, you get a discount...), exporting it as PDF.
Print module
- 2 new brightness/contrast sliders in the Print Job section for quick printer tuning (printer tuning, not individual photo tuning - see soft proofing in Develop module for individual photo tuning).
Web module
- Flash gallery is now color managed, that is color spaces are passed to web browser that support them.
- There is a link to Lightroom Exchange to look for web galleries of other users.
New DNG Format
- New lossy DNG format: it's a new DNG format where the demosaic algorithm is already applied (so you don't have anymore the real raw data out of camera sensor) but with the advantage of around 4 times smaller file, also because data are compressed. It's a lossy format, that means that you loose some quality from the original photo, though often it is not visible.
- Note that it's a new format, so previous Lightroom versions cannot read it and, by now, most of other softwares also, so make your decision.
- I would personally stick with original RAW for my best photos, but I will consider it for "intermediate" quality photos, like "keep original RAW for best ones", convert to JPG for low/normal quality and trash the original RAW, convert to lossy DNG for medium quality - lossy DNG is editable in Lightroom without loosing quality as working with a JPEG (that is more lossy than lossy DNG if you want to keep reasonable file size...).
Price
Since the competition for RAW converters is quite tough and other softwares come with a lower price, Adobe has decided to significantly lower Lightroom price, basically to 50%! New licences for 149 $ / 109 € + VAT, upgrades for 79 $ / 62 € + VAT. This is very good news and completes our deep review.